Emad Adel Hanna

I am a Cloud Solution Architect

Emad Adel

With over 15 years of experience in IT, I am a seasoned cloud solution architect and a Microsoft Certified Trainer. I currently work at KlayyTech, a leading IT company that provides cloud services and solutions to clients across various industries.
Erat volutpat. Ut wisi enim ad minim veniam, quis nostrud exerci tation ullamcorper.

  • Cairo, Egypt
  • +20-12-4892008, +20-016-3008167
  • me@emadadel.com
  • it.emadadel@hotmail.com
  • www.emadadel.com
Me

My Professional Skills

I have successfully led numerous cloud migration projects, ensuring a smooth transition from on-premises to cloud-based environments. I also have expertise in cloud security and compliance, ensuring data protection and regulatory adherence. .

Microsoft Azure 90%
Microsoft 365 95%
Amazon AWS 70%
Enterprise Architect 60%

Training Services

I give people practical skills and knowledge for the workplace. It can help and improving their skills (Azure ,AWS , Microsoft 365 and SharePoint ).

IT consultant services

Helping businesses use technology to achieve their goals. and offer expertise in areas like cloud computing, cybersecurity, and software selection, and can improve efficiency, reduce risk, and save costs..

Professional Services

As and Azure expert and microsoft 365, I provide the best services, support and advice for all things Microsoft (Microsoft migration, support, and optimisation services).

Enterprise Architect services

help organizations align their IT infrastructure with business strategy. They basically design, evaluate, and build a blueprint for how technology supports the company's goals..

0
Completed project
0
Certifications Award
0
Success Training and Sessions
Completed Consultant projects
  • 📊 How to Get a Report of All Users and Devices Last Sign-In in Active Directory Using PowerShell 💻

    📊 How to Get a Report of All Users and Devices Last Sign-In in Active Directory Using PowerShell 💻


    Active Directory (AD) is a critical component for IT administrators to manage users and devices in a network. 🚀 One common requirement is to generate reports on the last sign-in activity for users and devices in AD. 🔄 In this guide, I will show you how to use PowerShell to achieve this efficiently. 🔧


    📄 Prerequisites

    To follow this guide, you need:

    1. 💻 PowerShell installed on your system (version 5.1 or later).

    2. 📝 Active Directory PowerShell module installed.

    3. 🔒 Appropriate permissions to query Active Directory.


    🔢 PowerShell Commands to Get Last Sign-In Reports

    1. 👤 For Users

    The following command retrieves all users in Active Directory along with their last logon time:

    # Get all users and their last logon time
    Get-ADUser -Filter * -Property DisplayName, SamAccountName, LastLogonTimestamp |
    Select-Object DisplayName, SamAccountName, @{Name="LastLogon"; Expression={[datetime]::FromFileTime($_.LastLogonTimestamp)}} |
    Export-Csv -Path "C:\Reports\UsersLastSignIn.csv" -NoTypeInformation -Encoding UTF8
    • 🔍 What It Does:

      • Get-ADUser: Retrieves user information from AD.

      • -Filter *: Fetches all users.

      • LastLogonTimestamp: Retrieves the last logon time for each user.

      • Export-Csv: Exports the results to a CSV file for review.

    • 📈 Output: The command generates a CSV file named UsersLastSignIn.csv in the C:\Reports directory.

    2. 📚 For Devices

    Similarly, use the command below to get the last sign-in details for devices:

    # Get all computers and their last logon time
    Get-ADComputer -Filter * -Property Name, LastLogonTimestamp |
    Select-Object Name, @{Name="LastLogon"; Expression={[datetime]::FromFileTime($_.LastLogonTimestamp)}} |
    Export-Csv -Path "C:\Reports\DevicesLastSignIn.csv" -NoTypeInformation -Encoding UTF8
    • 🔍 What It Does:

      • Get-ADComputer: Retrieves computer information from AD.

      • LastLogonTimestamp: Retrieves the last logon time for each device.

      • Export-Csv: Saves the output to a CSV file named DevicesLastSignIn.csv.


    📊 Understanding the Commands

    • 🔹 LastLogonTimestamp vs. LastLogon:

      • LastLogonTimestamp: Replicated across domain controllers but may be up to 14 days old.

      • LastLogon: Real-time but requires querying all domain controllers.

    • 🔹 File Path: You can change the file path (C:\Reports\) to save the report to your preferred directory.


    🚨 Benefits of Using PowerShell

    • ⏳ Time-Saving: Automates a manual task.

    • 🎨 Customizable: You can add or remove properties as needed.

    • 📄 Portable Reports: The CSV files can be easily shared and analyzed.


    📚 Conclusion

    Using PowerShell to get reports on the last sign-in activity for users and devices in Active Directory is a straightforward and powerful approach. 🚀 These commands not only provide valuable insights but also save time by automating repetitive tasks.

    Try these commands in your environment and let me know in the comments if you have any questions or suggestions! 😊


    Tags: 🔧 PowerShell, 🔰 Active Directory, 🔒 IT Administration, 🌐 Last Logon Report, ⚙️ Automation

  • تسجيل الدخول الموحد (SSO)

    تسجيل الدخول الموحد (SSO)


    ♦️تسجيل الدخول الموحد (SSO): مفتاح واحد لفتح العديد من الأبواب


    تخيل أنك تمتلك مجموعة كبيرة من المفاتيح، لكل باب في منزلك مفتاح مختلف. تخيل العناء الذي ستتعرض له كل يوم لتذكر كل هذه المفاتيح وإدارتها. هذا بالضبط ما يشعر به المستخدمون عندما يتعين عليهم تذكر مجموعة مختلفة من أسماء المستخدمين وكلمات المرور لكل موقع ويب أو تطبيق يستخدمونه.


    ♦️تسجيل الدخول الموحد (Single Sign-On)، أو اختصاراً (SSO)،


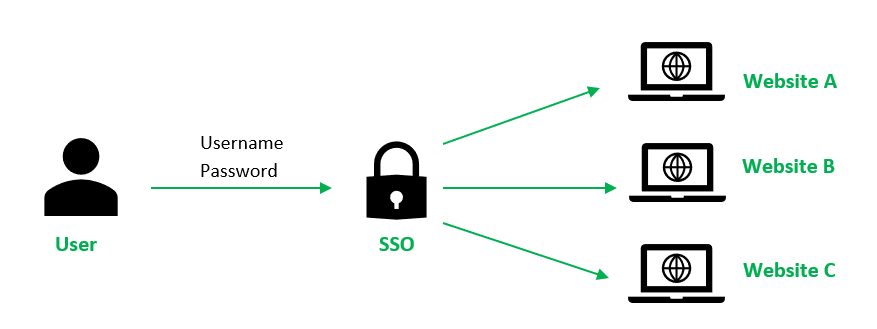
    هو الحل الأمثل لهذه المشكلة. فهو نظام مصادقة يسمح للمستخدمين بتسجيل الدخول إلى العديد من التطبيقات والمواقع الإلكترونية المختلفة باستخدام مجموعة واحدة فقط من بيانات الاعتماد (اسم المستخدم وكلمة المرور).


    ♦️كيف يعمل SSO؟


    عندما تقوم بتسجيل الدخول إلى تطبيق أو موقع ويب يدعم SSO، يتم التحقق من هويتك مرة واحدة فقط. بعد ذلك، يتم منحك "رمز وصول" يسمح لك بالوصول إلى جميع التطبيقات الأخرى المتصلة بنظام SSO دون الحاجة إلى إعادة إدخال بيانات اعتمادك.


    ♦️العمليات الأساسية في SSO:


    1️⃣ التسجيل: يقوم المستخدم بتسجيل حساب واحد في نظام SSO.

    2️⃣ المصادقة: يتم التحقق من هوية المستخدم عند تسجيل الدخول الأول.

    3️⃣ إصدار رمز الوصول: بعد المصادقة بنجاح، يتم إصدار رمز وصول فريد للمستخدم.

    4️⃣ الوصول إلى التطبيقات: يستخدم المستخدم رمز الوصول للوصول إلى أي تطبيق متصل بنظام SSO.


    ♦️ فوائد SSO:


    1️⃣تحسين تجربة المستخدم: يقلل SSO من الوقت والجهد اللازمين لتسجيل الدخول إلى التطبيقات المختلفة.

    2️⃣تعزيز الأمان: يقلل من خطر اختراق الحسابات، حيث يتم تخزين بيانات اعتماد المستخدم في مكان واحد وآمن.

    3️⃣زيادة الإنتاجية: يزيد من إنتاجية المستخدمين من خلال تقليل الوقت الذي يقضونه في إدارة كلمات المرور.

    4️⃣ تسهيل إدارة المستخدمين: يتيح للمسؤولين إدارة حسابات المستخدمين بشكل مركزي.


    ♦️تحديات SSO:


    1️⃣ تعقيد التنفيذ: قد يكون تنفيذ نظام SSO معقدًا، خاصة في المؤسسات الكبيرة.

    2️⃣ اعتماد على نقطة واحدة: إذا تم اختراق نظام SSO، فإن جميع التطبيقات المتصلة به تكون معرضة للخطر.

    3️⃣ تكلفة التنفيذ: قد تتطلب تكاليف إضافية لشراء وتنفيذ نظام SSO.


    ختامًا، يعد تسجيل الدخول الموحد (SSO) حلاً فعالاً لتعزيز أمن وتجربة المستخدم في بيئات التطبيقات المتعددة. مع استمرار تطور التكنولوجيا، من المتوقع أن يزداد اعتماد الشركات والمؤسسات على SSO لتلبية احتياجات المستخدمين المتزايدة.


  • Add Shortcut to OneDrive" Feature in SharePoint Online

    Add Shortcut to OneDrive" Feature in SharePoint Online

    تمكين ميزة "إضافة اختصار إلى OneDrive" في SharePoint Online

    تمكين ميزة "إضافة اختصار إلى OneDrive" لجميع المستخدمين في SharePoint Online

    تُعد ميزة "Add shortcut to OneDrive" من الميزات المهمة في SharePoint Online، حيث تتيح للمستخدمين إمكانية إنشاء اختصارات للمجلدات المخزنة في SharePoint داخل OneDrive الخاص بهم. هذا يسهل الوصول إلى الملفات وإدارتها من خلال تطبيق OneDrive أو عبر مستكشف الملفات في Windows.

    الطريقة الأولى: باستخدام PowerShell

    يمكنك استخدام SharePoint Online Management Shell لتفعيل الميزة لجميع المستخدمين عبر الأوامر التالية:

    1. تثبيت وحدة SharePoint Online Management Shell

    Install-Module -Name Microsoft.Online.SharePoint.PowerShell -Force -AllowClobber

    2. الاتصال بـ SharePoint Online

    Connect-SPOService -Url https://yourtenant-admin.sharepoint.com

    استبدل yourtenant باسم نطاق SharePoint الخاص بمؤسستك.

    3. تمكين الميزة لجميع المستخدمين

    Set-SPOTenant -DisableAddShortcutsToOneDrive $false

    4. التحقق من التغيير

    Get-SPOTenant | Select DisableAddShortcutsToOneDrive

    إذا كان الناتج $false، فهذا يعني أن الميزة قد تم تفعيلها بنجاح.

    الطريقة الثانية: عبر مركز إدارة Microsoft 365

    إذا كنت تفضل استخدام واجهة المستخدم بدلاً من PowerShell، يمكنك تمكين الميزة عبر Microsoft 365 Admin Center باتباع الخطوات التالية:

    1. الانتقال إلى مركز إدارة SharePoint

    قم بتسجيل الدخول إلى SharePoint Admin Center باستخدام حساب مسؤول.

    2. فتح الإعدادات

    من القائمة الجانبية، انقر على "الإعدادات" (Settings).

    3. تفعيل ميزة "إضافة اختصار إلى OneDrive"

    ابحث عن خيار "Add shortcut to OneDrive" وتأكد من ضبطه على "Enabled" أو "مُمكّن".

    4. حفظ التغييرات

    بعد إجراء التغيير، اضغط على حفظ (Save) وانتظر حتى يتم تطبيقه على جميع المستخدمين.

    ملاحظات هامة

    • قد يستغرق تطبيق التغيير بضع ساعات ليصبح ساري المفعول لجميع المستخدمين.
    • يحتاج المستخدمون إلى تحديث المتصفح أو إعادة تسجيل الدخول لرؤية التغيير.
    • يمكن للمستخدمين بعد التفعيل إضافة أي مجلد مشترك من SharePoint إلى OneDrive بسهولة عن طريق الضغط على "Add shortcut to OneDrive".

    الخاتمة

    يعد تمكين ميزة "إضافة اختصار إلى OneDrive" خطوة مفيدة لتعزيز إنتاجية المستخدمين وسهولة الوصول إلى الملفات في بيئة العمل. سواءً اخترت تنفيذها عبر PowerShell أو مركز إدارة Microsoft 365، فإن هذه الميزة تساهم في تحسين تجربة المستخدم داخل Microsoft 365.

    إذا كنت بحاجة إلى مزيد من التفاصيل أو كنت تواجه أي مشكلات، لا تتردد في التواصل معنا!